
This week we will be learning how to start out a new blog..or do a beautiful makeover on your current blog. Blogs don't have to be journal writing, they can simply be a way to store and post your favorite pictures, or even a place to share with others the things you have learned while being a mommy. You can make a family blog, a business blog, a picture editing blog, or even just a rambling on of your mommy life blog! Make it yours! Personalize it, and share it with friends and family! We would LOVE to see the blogs you have created from this challenge...link us there so we can check it out and share ideas! This will be a two week challenge, so be prepared for more fun next week!
Here are the few example of Julie and Erins Blogs that we have done to help show you the final project. Each one has a different example in it (premade background, self made background, premade header, simple header, slide show header, etc. )
TheAndressFamily
JuliesBlogExamples
TheHendersonz
TheHenderson05
~ Go to www.blogger.com, click Create blog, and fill in your information.
- You can choose any template that you would like. BUT...if you want to change your background on it, then it MUST be a "minima" template. Choose your template, then you are set to start Blogging!
A few good things to know about your new blog is where to post and edit your blog.
On the top right side you will find either your Dashboard or Customize. Click on those, and you will be able to edit your layout, edit old posts or create new posts. You can also change the color of your fonts and all your other blog settings!
Wednesday, April 7, 2010
Making your Center Blogger wider
~First go to the top right of your blog and click Dashboard. You can always find your "customize" either at the top of your blog, or through your dashboard. Next click LAYOUT and EDIT HTML.
Scroll down until you see the next set of changes: (NOTE: You will be changing JUST the width numbers)
Find: #header-wrapper {
width:660px;
change to : #header-wrapper {
width:1000px;
Find: #outer-wrapper {
width: 660px;
Change to: Find: #outer-wrapper {
width: 1000px;
Find: #main-wrapper {
width: 410px;
Change to: #main-wrapper {
width: 750px;
Find: #footer {
width:660px;
Change to: #footer {
width:1000px;
- Click Save
This is going to give you more room on your center blogger, you will then be able to make your pictures larger..YAY!!!
NOTE: You wont"see" a change until you add color to your center...thats the next step!
Changing the center bloggers color
~First go to the top right of your blog and click Dashboard. You can always find your "customize" either at the top of your blog, or through your dashboard. Next click LAYOUT and EDIT HTML.
Towards the top you will see a section of "Variable names". Above the FIRST variable name, post this code:
< Variable name="blogwrappercolor" description="Blog Wrapper Color"
type="color" default="#fff" value="#ffffff" >
- Next scroll down until you see:
#outer-wrapper {
width: 1000px;
Add this code directly behind the: #outer-wrapper {
background: $blogwrappercolor;
Your end should look exactly like this:
#outer-wrapper { background: $blogwrappercolor;
width: 1000px;
-Then Hit Save
- At the top, go to "fonts and colors". With codes we added above, we can now change the color of our center blogger part(where you will type and post pictures).
- Click on "Blog Wrapper color". It will be the first option. If it's not there, you probably entered the a code in wrong. Go back and make sure all the correct changes are done.
- You can choose your color from the options they give you, or you can enter the HEX # into the box. You can get this # by double clicking on your color options in PS or gimp, and you will find a number that corresponds with every color. Copy it, and paste it in the box on your blog screen. You can change this color whenever you want
- Click Save and view blog! (there will be white at the bottom until you do your first post)
Tuesday, April 6, 2010
Using and installing pre made backgrounds
There are MANY sites that you can get beautiful FREE, pre made backgrounds. Here is a few of my favorites:
- Scrap-e-blog
- Cutest Blog on the Block
- Shabby Blogs
- CoffeeShop
INSTALLING PRE-MADE BACKGROUNDS
- Copy the code that is given to you with the background. It's a long code that starts and ends with < script >. Make sure you copy it all.
- Go to your blog and go to your Dashboard and hit Layouts, then Page Elements. Or Go to Customize, then layouts then Page Elements.
- Click to "ADD a Gadget". You can use it anywhere...but I normal use the very bottom one to keep it out of the way. In the TITLE spot, leave it blank. If you type in it, it WILL show on your blog. In the CONTENT spot, paste your code. Hit save and then "preview your blog".
You can go back and change your blog background as many times as you want by taking the same steps. Just make sure you always use the same "gadget" spot, and delete your old code before pasting the new one.
Creating and Installing Custom made Background
NOW, If you want to take it to the next step up, you can also CREATE your own blog background. This obviously takes more time...and patience. It can be a bit frustrating trying to get the sizing right. But if you are looking for something more personalized, then this is the way to go.
CREATING YOUR OWN BLOG BACKGOUND
- In your editing program(Photoshop, Elements, or GIMP), open up a new page. Size it to 24inches wide and 15inches tall, at 72 ppi. NOW even though you create your page this big, not ALL of the page will show up on your blog. But if you create it any smaller, you will see white on the sides or the bottom. SO stick with this size.
- Use your Free Scrapbook kits, or Paper you create by using Textures. If you use premade kits, make sure your give credit to the "maker of the kit". (we will add this next week, so just remember what kit you used. ) You can use papers, Ribbons, embellishments and Brushes to get the look you are looking for.
§ TIP: From experience (of trial and error), we have found that its best to do a simple repeating background, because depending on the size of one's computer screen, it will change the way they see your blog. SO some things maybe cut off on other screens.
- Make your first layer a FULL(24x15) solid background of a paper or color you want. Can be solid or textured.
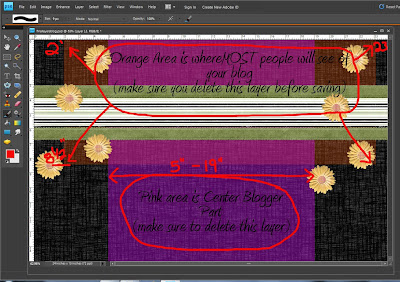
- On your next layer create a box using your rectangle tool. Fill it with any color.(we will only be using this as a guide tool, and will delete it before saving. The box should be 15 inches tall, and should fill everywhere between the 5inch mark and the 19inch mark. This will show you "ABOUT" where your center posting part on your blog will be. So everything under that box will not show up on you blog.
- Decorate the two outer sides of that box(Everything on its own layers).
§ TIP: Because everyone's computer screen show a different amount of your background, we have found the best spots to decorate are between inches 2-5 and 19-23. BUT also add decoration to the other few inches for those that it shows the FULL screen to. AND, there is no need to decorate any lower than 10 inches...this will not show on anyone's blogs. It is only used as extra space(but must be there). So it may be helpful to create ANOTHER layer with a second box(you can turn the opacity low). Put this box from 2-13inches, and 8.5 inches long. This will show you where MOST peoples computers will cut your blog off.
Here is an example:
- When you are happy with your design of your background,Make sure you delete the "box" layers we created as your tools. THEN save it FIRST as a (xcf(gimp) or psd(ps)). This will save it in layer form, in case you need to go back later to make and changes. Next save it as a jpg.
INSTALLING YOUR OWN BACKGROUND
- Open up a word document, or notepad. And Copy this code on to a new page
<style type="text/css"> body {background-image: url("YOUR PHOTO URL HERE"); background-position: top center; background-repeat: no-repeat; background-attachment: fixed; }</style>
- Go to Tinypic.com or Imagehost.org and upload your design. Copy the Directlink(tinypic.com) or the Hotlink(imagehost.com)
- Paste your link into the above code where it says "Your Photo URL here". MAKE SURE YOU LEAVE THE "" marks in the code!!!!
- Copy your NEW WHOLE code.
- Go to your blog and go to your Dashboard and hit Layouts, then Page Elements. Or Go to Customize, then layouts then Page Elements.
- Click to "ADD a Gadget". You can use it anywhere...but I normal use the very bottom one to keep it out of the way. In the TITLE spot, leave it blank. If you type in it, it WILL show on your blog. In the CONTENT spot, paste your code. Hit save and then "preview your blog".
You can go back and change your blog background as many times as you want by taking the same steps. Just make sure you always use the same "gadget" spot, and delete your old code before pasting the new one. When you are creating your own background you may need to do a few "tries" before you get the look right. That's why it's best to leave them all in layers, so you can move your embellishments around to where you can see them on your blog.
CREATING YOUR OWN BLOG BACKGOUND
- In your editing program(Photoshop, Elements, or GIMP), open up a new page. Size it to 24inches wide and 15inches tall, at 72 ppi. NOW even though you create your page this big, not ALL of the page will show up on your blog. But if you create it any smaller, you will see white on the sides or the bottom. SO stick with this size.
- Use your Free Scrapbook kits, or Paper you create by using Textures. If you use premade kits, make sure your give credit to the "maker of the kit". (we will add this next week, so just remember what kit you used. ) You can use papers, Ribbons, embellishments and Brushes to get the look you are looking for.
§ TIP: From experience (of trial and error), we have found that its best to do a simple repeating background, because depending on the size of one's computer screen, it will change the way they see your blog. SO some things maybe cut off on other screens.
- Make your first layer a FULL(24x15) solid background of a paper or color you want. Can be solid or textured.
- On your next layer create a box using your rectangle tool. Fill it with any color.(we will only be using this as a guide tool, and will delete it before saving. The box should be 15 inches tall, and should fill everywhere between the 5inch mark and the 19inch mark. This will show you "ABOUT" where your center posting part on your blog will be. So everything under that box will not show up on you blog.
- Decorate the two outer sides of that box(Everything on its own layers).
§ TIP: Because everyone's computer screen show a different amount of your background, we have found the best spots to decorate are between inches 2-5 and 19-23. BUT also add decoration to the other few inches for those that it shows the FULL screen to. AND, there is no need to decorate any lower than 10 inches...this will not show on anyone's blogs. It is only used as extra space(but must be there). So it may be helpful to create ANOTHER layer with a second box(you can turn the opacity low). Put this box from 2-13inches, and 8.5 inches long. This will show you where MOST peoples computers will cut your blog off.
Here is an example:

- When you are happy with your design of your background,Make sure you delete the "box" layers we created as your tools. THEN save it FIRST as a (xcf(gimp) or psd(ps)). This will save it in layer form, in case you need to go back later to make and changes. Next save it as a jpg.
INSTALLING YOUR OWN BACKGROUND
- Open up a word document, or notepad. And Copy this code on to a new page
<style type="text/css"> body {background-image: url("YOUR PHOTO URL HERE"); background-position: top center; background-repeat: no-repeat; background-attachment: fixed; }</style>
- Go to Tinypic.com or Imagehost.org and upload your design. Copy the Directlink(tinypic.com) or the Hotlink(imagehost.com)
- Paste your link into the above code where it says "Your Photo URL here". MAKE SURE YOU LEAVE THE "" marks in the code!!!!
- Copy your NEW WHOLE code.
- Go to your blog and go to your Dashboard and hit Layouts, then Page Elements. Or Go to Customize, then layouts then Page Elements.
- Click to "ADD a Gadget". You can use it anywhere...but I normal use the very bottom one to keep it out of the way. In the TITLE spot, leave it blank. If you type in it, it WILL show on your blog. In the CONTENT spot, paste your code. Hit save and then "preview your blog".
You can go back and change your blog background as many times as you want by taking the same steps. Just make sure you always use the same "gadget" spot, and delete your old code before pasting the new one. When you are creating your own background you may need to do a few "tries" before you get the look right. That's why it's best to leave them all in layers, so you can move your embellishments around to where you can see them on your blog.
Creating a Simple Blog Header
Now, if you want a simple blog header, COFFEESHOP (HERE) has a great tutorial that shows you what size to crop your photo and how to add text to it before uploading it. I actually used this tutorial for my BLOG (TheAndressFamily). To do this:
- Crop your picture between 660 – 1000 pixels wide and 150-400 pixels high. How big you go is more a matter of taste, and if you make it too big Blogger will shrink it to size. You can crop at 72ppi since it will be used for web, not print. The higher ppi, the longer it will take for your page to load. Sometimes it is best to create it bigger, so you only have to size it down if it's too big for you taste. If you make it too small, and want it bigger, you have to start all over.
- Now you can add your text. Remember that if you want to use a particular color from your picture as the text color, just use the eyedropper to select the color. And MeShell’s pattern fill challenge is great for creating letters for this.
- When you’re done, Flatten and Save your image as a jpg.
- Go to your blog and go to your Dashboard and hit Layouts, then Page Elements. Or Go to Customize, then layouts then Page Elements. Click Edit on your Header, and load your new one, and select "Instead of Title and Description"
- Save and preview. If you want it to be smaller, go back to the editing program and resize and save again.
Using Premade Headers
Another option is to use a premade template like the ones COFFEESHOP offers(HERE). She mixes her storyboards and blogger templates together, so just look to make sure the one you download is for a blog header. Now these can only be used in PS or PSE, but they’re great for getting ideas from if you use Gimp. If you do use these, just add your pictures to her template, and upload it to Blogger the same way as said above.
Subscribe to:
Posts (Atom)